CC 1420 LECTURE 7: DAILY CLEANING CHECKLIST#2 – FOR MINT INSTANTFLEX TL70

instant-university_CC1420-lecture-7-daily-mint-tl70-cleaning-title

instant-university_CC1420-lecture-7-daily-mint-tl70-cleaning-icon


INTRODUCTION
instant-university_yellow-border

In lecture 2, we have discussed about a cleaning method for the Polaroid SX-70 cameras. After opening the film door, it is easy to see if the rollers are clean. But for some other instant cameras like InstantFlex TL70, it may be difficult to check the rollers as they are located inside the camera body. Don’t worry, we have a solution for this. Apart from asking MiNT warranty centre for regular service, you can do it yourself.


CIRCUMSTANCESinstant-university_yellow-border

instant-university_CC1420-lecture-3-air-traveling-with-instant-films-and-cameras-#11

When is the time to clean the rollers?

instant-university_CC1420-lecture-3-air-traveling-with-instant-films-and-cameras-#12

When you found that there are some unwanted white spots or marks shown on the film, this is probably the cleaning time.

instant-university_CC1420-lecture-7-daily-mint-tl70-cleaning-#6

STEPSinstant-university_yellow-border

1. Put double sided tape on one side of the film in order to make this side sticky.

instant-university_CC1420-lecture-7-daily-mint-tl70-cleaning-#1

Noted: We recommend you use the Scotch Permanent Double Sided Tape and don’t stick the tape on double sides of film at one time. If the tape is too thick the film may be hard to be ejected from the camera.

c862b94b0d28e1b3dd1489071f836f45

2. Open the film door and put the film close to the rollers, assist with hand.

instant-university_CC1420-lecture-7-daily-mint-tl70-cleaning-#2

3. Press the film-ejecting button.

4. When the rollers are pressing the film, the tape sticks away the dirt on one rollers.

Noted: As the width of film is shorter than the length of rollers, when you place the film near the ejecting mouth, put it incline to one side first, and the other side next, this can make sure you clean the whole roller.

instant-university_CC1420-lecture-7-daily-mint-tl70-cleaning-#3

5. Repeat step 2 to 4. This time, turn the film over and let the sticky side touch the other roller.

instant-university_CC1420-lecture-7-daily-mint-tl70-cleaning-#4

instant-university_CC1420-lecture-7-daily-mint-tl70-cleaning-#5

6. Try to do the above steps several time until you think it is okay.

Noted: If you think the the tapes aren’t sticky anymore, you should change a new film with new tape to continue.

CC 1235 Lecture 1: Choose right film for my camera

instant-university_CC1235-lecture-1-choose-right-film-for-my-camera-title

instant-university_CC1235-lecture-1-choose-right-film-for-my-camera-icon

IMPOSSIBLE EVOLUTION
instant-university_yellow-border

Old cameras & new films

After Polaroid Corporation announced that all instant films would no longer be produced after 2008, The Impossible Project was founded and bought the entire Polaroid factory in EnschedeNetherlands – they pledged to bring Polaroid film back.

instant-university_CC1235-lecture-1-choose-right-film-for-my-camera-#1


AT PRESENT
instant-university_yellow-border

The Impossible Project is the only company in the world producing instant films for classic Polaroid SX-70 and 600 cameras. Another famous Japan-based company Fujifilm produces not only digital cameras but also instant cameras and films. 

instant-university_CC1235-lecture-1-choose-right-film-for-my-camera-#2

In this lecture, you will know clearly about films that are still being widely used and how to choose the right film for your camera.


THE IMPOSSIBLE PROJECT
instant-university_yellow-border

Instant films produced by The Impossible Project can be categorised by 4 types:

instant-university_CC1235-lecture-1-choose-right-film-for-my-camera-#3 Polaroid SX-70 – Color / Black & White
instant-university_CC1235-lecture-1-choose-right-film-for-my-camera-#4 Polaroid 600-Type  – Color / Black & White
instant-university_CC1235-lecture-1-choose-right-film-for-my-camera-#5 Polaroid Image / Spectra – Color / Black & White
instant-university_CC1235-lecture-1-choose-right-film-for-my-camera-#6 8×10 Cameras and Backs – Color / Black & White

instant-university_CC1235-lecture-1-choose-right-film-for-my-camera-#7
It’s easy to know which film is compatible with your camera. Simply open the film door and you will see a sticker indicating “600” type film / “SX-70” type film / “Image” or “Spectra” type film.

instant-university_CC1235-lecture-1-choose-right-film-for-my-camera-#3
Polaroid SX-70 film
is acceptable with:

– Polaroid SX-70
– Polaroid SX-70 Model 3
– Polaroid Onestep
-Polaroid Time Zero Onestep
– Polaroid 1000
– Polaroid 1000 Deluxe
– Polaroid Supercolor 1000 Deluxe
– Polaroid 3000
– Polaroid Pronto! RF

instant-university_CC1235-lecture-1-choose-right-film-for-my-camera-#4
Polaroid 600 film
is acceptable with:

– Polaroid 600 Autofocus 660
– Polaroid SLR 680
-Polaroid SLR 690
– Polaroid Integral 600 series
– Polaroid One Step close-up
– Polaroid One Step AF Autofocus Digital Exposure System
– Polaroid Sun 600 LMS Light Management System

instant-university_CC1235-lecture-1-choose-right-film-for-my-camera-#5
Polaroid Image / Spectra film
is acceptable with:

– Polaroid Spectra / Image series

instant-university_CC1235-lecture-1-choose-right-film-for-my-camera-#8

In March 2015, Impossible announced the initial launch of Generation 2.0 (Gen2.0) film for the Black & White line. Now, the newly launched Black & White films work with all types of cameras stated above. New formula of Black & White has a quicker developing time, increased contrast and tonality.

instant-university_CC1235-lecture-1-choose-right-film-for-my-camera-#9

In January 2016, Impossible launches Generation 3.0 (Gen3.0) film for the Color line. At present, it is exclusively for Impossible Member to test before general release. This generation of color film marks a significant improvement on Impossible’s current 600 color film formula. Photos develop in less half the time.


FUJIFILM
instant-university_yellow-border

Fujifilm now has 3 types of film: Instax mini film, Instax wide film and FP-film (packfilm). They are available in color films only. FP-3000B (ISO 3000 Black & White) was discontinued in May 2015.

instant-university_CC1235-lecture-1-choose-right-film-for-my-camera-#3
Instax mini film
is acceptable with:

– MiNT InstantFlex TL70
– Fujifilm Instax Mini 7S
– Fujifilm Instax Mini 8
– Fujifilm Instax Mini 25
– Fujifilm Instax Mini 50S
– Fujifilm Instax Mini 70
– Fujifilm Instax Mini 90 NEO CLASSIC
– Lomo’Instant series

instant-university_CC1235-lecture-1-choose-right-film-for-my-camera-#4
Instax wide film
is acceptable with:

– Fujifilm Instax 210 Wide
– Fujifilm Instax Wide 300
– Lomo’Instant Wide series

instant-university_CC1235-lecture-1-choose-right-film-for-my-camera-#5
FP-100C film
is designed to be used in the instant backs for medium format SLR cameras and Polaroid Land cameras. 

CC 1420 Lecture 3: Air traveling with instant films and cameras

instant-university_CC1420-lecture-3-air-traveling-with-instant-films-and-cameras-title

instant-university_CC1420-lecture-3-air-traveling-with-instant-films-and-cameras-icon

WHY ANNOTATE?
instant-university_yellow-border

instant-university_CC1420-lecture-3-air-traveling-with-instant-films-and-cameras-#1

Many Instant Photographers may have the same X-ray concern about carrying undeveloped films when traveling. In this chapter, you will learn what to do and what NOT to do when traveling, without X-ray damaging to your instant films and cameras.


HOW?
instant-university_yellow-border

instant-university_CC1420-lecture-3-air-traveling-with-instant-films-and-cameras-#2

instant-university_CC1420-lecture-3-air-traveling-with-instant-films-and-cameras-#3Before departure

BRING FILMS AS CARRY-ON LUGGAGE

instant-university_CC1420-lecture-3-air-traveling-with-instant-films-and-cameras-#4

instant-university_CC1420-lecture-3-air-traveling-with-instant-films-and-cameras-#5Unprocessed film is sensitive to light just as they are waiting to be exposed. Although Impossible Project film has a rather low ISO of 160 for SX-70, and ISO 640 for 600 cameras, X-ray of checked baggage screener may still penetrate and expose the film. Whereas carry-on baggage screener has a much milder X-ray – films under ISO800 such as Fujifilm instax mini film and instax wide film are usually not affected.

So never pack unprocessed film in baggage that will be checked. Or you can politely insist on hand-inspection of the film whenever possible.

instant-university_CC1420-lecture-3-air-traveling-with-instant-films-and-cameras-#6

instant-university_CC1420-lecture-3-air-traveling-with-instant-films-and-cameras-#7After arrival

PHOTOGRAPHING IN EXTREME TEMPERATURES

instant-university_CC1420-lecture-3-air-traveling-with-instant-films-and-cameras-#8Extreme cold guideinstant-university_CC1420-lecture-3-air-traveling-with-instant-films-and-cameras-#8

When you want to take photos in a freezing cold place (e.g. -10°C to -15°C / 14°F to 5°F and below), you should put the camera inside your bag or  your coat pocket and keep it near your body prior to shooting. Using your body temperature is a good way to ensure that your camera will work well.

Instant film is highly sensitive to temperature. After the camera ejects picture, immediately place it in your pocket or directly onto heat pads. A moderate room temperature of around 25°C / 77°F is optimal for developing camera pictures. Warm the photo with your body temperature is the easiest way. Low temperature will overexpose a photo. It may look bluish, lightened and less contrasted.

instant-university_CC1420-lecture-3-air-traveling-with-instant-films-and-cameras-#9Extreme hot guideinstant-university_CC1420-lecture-3-air-traveling-with-instant-films-and-cameras-#9

Travelling in a place with hot weather (e.g. 35°C to 40°C / 95°F to 104°F and above) is a different situation. Keeping the developing image under shade and keep it cool will help correcting the white balance and prevent reddish and yellowish to a large extent. DO NOT leave the exposing photo under direct sunlight.

Tips:
Hot temperature has a greater effect on B&W film than color. If you wish to get a better result with Polaroid cameras, snap with Impossible Color Film!

Impossible Project film can deliver good results when used within a temperature range of 13°C to 28°C / 55°F to 82°F, while 5°C to 40°C / 41°F to 104°F for Fujifilm instant film.

instant-university_CC1420-lecture-3-air-traveling-with-instant-films-and-cameras-#10

instant-university_CC1420-lecture-3-air-traveling-with-instant-films-and-cameras-#7After arrival

SHIELDING

Even with Color Protection Film, it is possible to be overexposed under strong sunlight. The first few seconds are extremely crucial for image development. Always shield the film from light when it is ejected.

instant-university_CC1420-lecture-3-air-traveling-with-instant-films-and-cameras-#11
Can I use a black card, to cover the film with a hand or quickly turn the photo upside down?

instant-university_CC1420-lecture-3-air-traveling-with-instant-films-and-cameras-#12
To put a black card at picture exit slot is economical and may help, but it will not work as perfect as the Frog Tongue from Impossible Project.

instant-university_CC1420-lecture-3-air-traveling-with-instant-films-and-cameras-#13

instant-university_CC1420-lecture-3-air-traveling-with-instant-films-and-cameras-#7After arrival

THE USE OF MANUAL FOCUS

instant-university_CC1420-lecture-3-air-traveling-with-instant-films-and-cameras-#14

Some Polaroid cameras such as SX-70 Sonar, use sonar to auto focus. When you are on a coach or railway cabin, visiting in museum or aquarium, as long as there is glass between you and the object, the sonar auto focus will not work because sonar will bounce back when it hits the glass. In order to shoot through glass, simply switch to manual focus and you are good to go!

CC 1420 Lecture 1: Film storage – How to keep film in good condition

instant-university_CC1420-lecture-1-film-storage-title

instant-university_CC1420-lecture-1-film-storage-icon

AFTER PURCHASE
instant-university_yellow-border

instant-university_CC1420-lecture-1-film-storage-#1

When you purchase a fresh pack of film for your Polaroid camera, normally an unopened package is allowed to store for 12 months. For opened film, better to finish photographing within a month.

instant-university_CC1420-lecture-1-film-storage-#2

Optimum range of temperature for Impossible Project film storage is between 15°C – 20°C (59°F – 68°F). As the film is super sensitive to light, avoid any exposure to sunlight. Otherwise it may cause undesirable chemical reaction.

For Fujifilm instant color film, keep it in the fridge at temperature below 10°C (50°F). Opened film packs can also be kept in the fridge by placing them into polyethylene or vinyl bags.

instant-university_CC1420-lecture-1-film-storage-#3
Store your films in a cool place and avoid sunlight. Do not store your films in damp proofing box – film chemicals will dry and will no longer develop images. Before use, try to settle to room temperature if the film is placed in the fridge. If you use the film while it is still cold, the photo quality may be adversely affected by condensation.


AFTER CARE
instant-university_yellow-border

(In short run) Shading

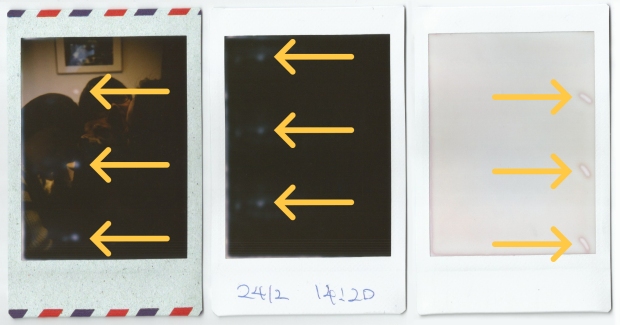
When the photo is ejected immediately after photographing, that will be the critical moment! Shield it from light immediately.

instant-university_CC1420-lecture-1-film-storage-#4

instant-university_CC1420-lecture-1-film-storage-#5-frogtongue


When developed film is exposed to strong light, the image will increase it brightness by approximately two stops. Somehow this will ruin the picture.

The best and most effective approach is to use a Frog Tongue. The frog tongue will essentially cover the photo when it is ejected, leaving it no chance at all to encounter light. Or a more economical way is to tape a black card on top of the picture exit slot. It acts similar to the frog tongue but it could be annoying to tape on and off.

After ejection, do not leave the film under direct sunlight while it is still developing. Also, do not bend, fold, or put pressure on the photo or else may cause unevenness on the image.


(In short run) Development

instant-university_CC1420-lecture-1-film-storage-#6

Keep shielding the image from light when developing. In about 15 minutes, the image will nearly be developed and stabilised.instant-university_yellow-border

(In long run) Location

The quality of finished images will change during storage. The key is to store the image in a cool place, preferably the fridge (not freezer).
instant-university_CC1420-lecture-1-film-storage-#7

(In long run) Temperature

Storing in crisper drawer is the optimum solution for image stability. Do not store the film under 0°C / 32°F as this may devastate images.

instant-university_CC1420-lecture-1-film-storage-#8


(In long run) Meth
ods

A. Make good use of your fridge

instant-university_CC1420-lecture-1-film-storage-#10

For the best results, put the photos in the fridge for 1 to 2 weeks. The temperature and humidity in crisper drawers (where to store fruits) can slower down the speed of changing colour and is effective to keep the color on films. After 2 weeks, you will find the pictures become rigid and stiff, that means the pictures have already “cooled down” and can exhibit like normal.

For Fujifilm, keep images in a dark dry and well-ventilated location away from gases. You don’t need to keep Fujifilm in the fridge like Impossible Project film.

B. Emulsion lift

instant-university_CC1420-lecture-1-film-storage-#12

It is about removing the emulsion layer from a sheet of Polaroid / Impossible or Fuji film and transferring it onto other surfaces such as clothing, painting paper, mug etc. After that the image is forever kept. During the process of emulsion lift, you can even enlarge or change the shape of the image. Special kit is needed for emulsion lift.

C. Air the chemical

instant-university_CC1420-lecture-1-film-storage-#14

Some will cut out 2 blank boxes behind Polaroid / Impossible image so as to fasten up the speed of drying chemicals. But after a certain period of time, the image will fade especially Black & White photos. Moreover, the back of image is unavoidably damaged thus many photographers avoid using this method.